动态规划-不同路径1
“不同路径问题”是LeetCode上的一系列问题(包含第62题、第63题和第980题),本文以第62题入手记录一下解决这种问题的思路,先贴上代码实现的Github地址。
问题描述
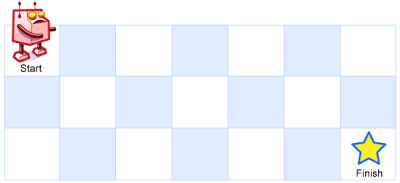
一个机器人位于一个 m x n 网格的左上角 (起始点在下图中标记为“Start” )。机器人每次只能向下或者向右移动一步。机器人试图达到网格的右下角(在下图中标记为“Finish”)。问总共有多少条不同的路径?(题目来源:力扣LeetCode)
示例 1:
输入: m = 3, n = 2
输出: 3
解释:
从左上角开始,总共有 3 条路径可以到达右下角。
1. 向右 -> 向右 -> 向下
2. 向右 -> 向下 -> 向右
3. 向下 -> 向右 -> 向右
这里需要注意的是当整个网格只有一格也就是m=1,n=1时,总共可能的路径为1。
问题分析和代码实现
如果遇到这个问题前没学习过动态规划的话那么肯定一上来就是穷举法,然后ifelse写的欲仙欲死,最后时间复杂度还上天,但学习了动态规划后就知道解决这类问题有套路——先自顶向下、然后自底向上,那么对于不同路径这个问题它的顶和底都是啥呢?首先对于m*n的网格我们考虑Finish节点(其实动态规划一般都是从尾部开始考虑整个问题的),可以很容易发现总的路径条数就等于从Start节点走到Finish节点正上方节点(记为top)的条数加上从Start节点走到Finish节点左前方节点(记为left)的条数,那么走到top节点的条数又取决于从Start节点到top正上方和top左前方路径条数的和,求走到left节点的条数同理。当然这里也有边界条件,当节点处于最上边(n=1)时或最左边(m=1)时此时路径条数恒为1(题目规定只能往右边或者下边走)。我们可以使用F(m,n)代表m*n的网格所有路径条数,经过上面的分析可以得出状态转移方程如下:
F(m,n)=1;//当m=1或者n=1时
F(m,n)=F(m-1,n)+F(m,n-1);//当m>1或者n>1时
至此为止自顶向下的分析过程就完成了,接下来是编写代码了,根据状态转移方程和边界条件我们可以很容易写出如下代码:
public int uniquePaths(int m, int n) {
    if(m<=0||n<=0){
        return 0;
    }
    if(m==1||n==1){
        return 1;
    }
    return uniquePaths(m-1,n)+uniquePaths(m,n-1);
}
上面这段代码经验证的确是没有逻辑上的问题的,并且空间复杂度为O(1),但它有一个最大的问题就是时间复杂度太高,代码执行过程如下图所示:
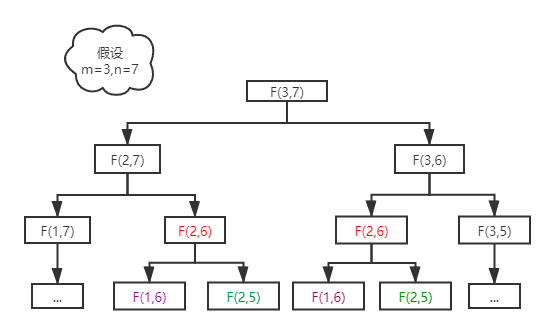
可以看到F(2,6)、F(1,6)、F(2,5)的值被重复计算了,而且代码越往下执行重复计算的次数越多,整个计算过程最后会变成一棵二叉树,时间复杂度为O(2^n)。众所周知时间复杂度为幂次方的算法都是不能上战场(工业使用)的,这段代码提交到LeetCode上系统也会提示超时,所以现在要降低重复计算的次数,可以很容易的想到使用一个二维数组arr[m][n]去保存每次计算F(m,n)后的结果,每次递归时判断arr[m][n]是否等于0,如果不等于0直接返回arr[m][n]即可,代码如下所示:
public int uniquePaths(int m, int n,int [][] arr) {
    if(arr == null){
        arr = new int[m][n];
    }
    if(arr[m-1][n-1]>0){
        return arr[m-1][n-1];
    }
    if(m<=0||n<=0){
        return 0;
    }
    if(m==1||n==1){
        arr[m-1][n-1] = 1;
        return arr[m-1][n-1];
    }
    arr[m-1][n-1] = uniquePaths(m-1,n,arr)+uniquePaths(m,n-1,arr);
    return arr[m-1][n-1];
}
上面这种解法也称作备忘录算法,时间复杂度和空间复杂度都是O(m*n),实测在m=20、n=20的情况下,未使用备忘录的算法等了将近半分钟还没结果,但是备忘录解法在0ms内输出了结果,优化效果还是很明显的,但别高兴得太早,备忘录算法还不算真正的动态规划算法,只有自底向上递推后得到的代码才能真正算得上动态规划算法。
自底向上递推
接上述,首先假设m=3、n=7,通过上面的分析和状态转移方程,我们做一个表格如下所示(一般自底向上递推的过程用表格会很直观,表格里的数字代表从Start走到此位置的路径条数):
| 行\列 | 1 | 2 | 3 | 4 | 5 | 6 | 7 |
|---|---|---|---|---|---|---|---|
| 1 | 1 | 1 | 1 | 1 | 1 | 1 | 1 |
| 2 | 1 | 2 | 3 | 4 | 5 | 6 | 7 |
| 3 | 1 | 3 | 6 | 10 | 15 | 21 | 28 |
从表格中很容易看出当m=1或者n=1的时候,当前节点对应的路径条数为1;当m>1并且n>1时,当前节点对应的路径条数为节点正上方和节点左前方路径之和,所以不用递归就可以求出结果。
public int uniquePaths(int m, int n){
    if(m <= 0 || n <= 0){
        return 0;
    }
    int arr[][] = new int[m][n];
    for(int i=0;i<m;i++){
        for(int j=0;j<n;j++){
            if(i == 0 || j == 0){
                arr[i][j] = 1;
            }else{
                arr[i][j] = arr[i-1][j]+arr[i][j-1];
            }
        }
    }
    return arr[m-1][n-1];
}
通过代码可以很容易得到动态规划算法时间复杂度和空间复杂度都是O(m*n),代码结构也十分清晰。
总结
- 动态规划一般前期自顶向下得出状态转移方程、边界和最优子结构,中期通过备忘录降低时间复杂度,后期通过自底向上递推(一般使用表格分析一组数据)得到最优算法。
- 动态规划的自顶向下分析一般从转移方程最末端开始分析,直到找到状态转移方程和边界
- 动态规划只有找到了状态转移方程和边界才能真正进行编码
相关文章
策略模式
策略模式的定义
策略模式是一种对象行为型模式,指的是对于对象的一种行为而言,在不同的场景下有不同的实现算法。譬如现在要对一个数组进行排序,排序方法有很多种(快速排序、冒泡排序等),在数据量多的时候我想使用快速排序,而在数据量少的时候我想使用冒泡排序,并且以后可能会增加其他的排序算法,这个时候应该如何组织代码才能符合设计模式的基本原则呢?
排序问题普通实现
对于上述排序问题,没有设计模式概念的人可能会写出以下代码:
public class Client{

    public void sort(int type,int [] arr){
        if(type == 1){
            bubbleSort(arr);
        }else if(type == 2){
            quickSort(arr);
        }
    }

    //冒泡排序
    public void bubbleSort(int [] arr){

    }

    //快速排序
    public void quickSort(int [] arr){

    }

    public static void main(String [] args){
        int [] arr = {5,2,3,6,1,8};
        Client client = new Client();
        //冒泡排序
        client.sort(1,arr);
        //快速排序
        client.sort(2,arr)
    }
}
这种方式固然能解决问题,并且只用一个类就实现了,但是后期如果想增加排序方式就得频繁地打开Client.java文件去修改代码,这就违背了开闭原则。那么如何在保证遵守开闭原则的同时可以解决这个问题呢,答案就是使用策略模式,使用策略模式解决这个问题的伪代码如下。
排序问题策略模式实现
首先定义一个ISortStrategy接口
public interface ISortStrategy{

    void sort(int [] arr);

}
再定义BubbleSortStrategy类实现ISortStrategy接口用于处理冒泡排序,定义QuickSortStrategy类实现ISortStrategy接口用于处理快速排序。
public class BubbleSortStrategy implements ISortStrategy{

    @Override
    public void sort(int [] arr){
        //冒泡排序代码
    }

}
public class QuickSortStrategy implements ISortStrategy{

    @Override
    public void sort(int [] arr){
        //快速排序代码
    }

}
然后定义SortTool类封装排序方法
public class SortTool{

    private ISortStrategy sortStrategy;

    public SortTool(ISortStrategy sortStrategy){
        this.sortStrategy = sortStrategy;
    }

    public void setSortStrategy(ISortStrategy sortStrategy){
        this.sortStrategy = sortStrategy;
    }

    public void sort(int [] arr){
        if(sortStrategy!=null){
            sortStrategy.sort(arr);
        }
    }

}
最后定义Client类执行调用
public class Client{

    public static void main(String [] args){
        int [] arr = {5,2,3,6,1,8};
        ISortStrategy bubbleSortStrategy = new BubbleSortStrategy();
        ISortStrategy quickSortStrategy = new QuickSortStrategy();
        SortTool sortTool = new SortTool(bubbleSortStrategy);
        sortTool.sort(arr);//冒泡排序
        sortTool.setSortStrategy(quickSortStrategy);//切换为快速排序
        sortTool.sort(arr);//快速排序
    }

}
当需要新增一种排序方式(譬如选择排序)时只需要新增SelectionSortStrategy类实现ISortStrategy接口并重写sort()方法就行,可以看出经过这样处理后我们的代码是完全遵守开闭原则的,要新增排序方式时只需要新增类实现ISortStrategy接口并重写sort()方法,然后在Client里初始化并使用即可,完全做到了对修改关闭、对扩展开放。策略模式的类图可以查看Graphic Design Pattern策略模式里绘制的。
策略模式的优缺点
优点
- 策略模式完全遵守”开闭原则”,用户可以在不修改原系统的基础上灵活选择算法和行为,同时也可以灵活添加算法和行为
- 策略模式可以避免多重条件语句的出现
缺点
- Client必须理解策略模式中所有算法或行为的作用才能决定使用哪种策略
- 策略模式会增加类的数量
相关文章:
设计模式的基本原则
快速排序
这是一个模板文件
Windows常用CMD命令
本文主要记录Windows系统下一些常用cmd命令的使用方法
-
查看端口占用
netstat -ano | findstr 端口号 -
列出文件夹下所有文件和子文件夹
dir
Retrofit的使用与源码解析
本文主要介绍Retrofit在android下的使用和对关键源码的解析。
使用方法
假设后端接口规定返回数据如下所示:
{
	code: 200,
	msg: "",
	data: {} //data可以是任何数据,对象、数组、null都行
}
我们现在要通过userId查询用户信息,首先要定义模型User
data class BaseResponse<T>(val code: Int, val msg: String? = null, val data: T? = null)

data class User(val name: String, val age: Int)
然后要定义接口Service,假设我们现在有一个获取用户信息的接口,接口完整路径为http://www.jianan.com/user,那么在Retrofit中http://www.jianan.com/就是这个接口的baseUrl,user就是接口的路径。
定义UserService如下:
interface UserService {

    @GET("user")
    suspend fun getUserInfo(@Query("userId") userId:String): Response<BaseResponse<User>>

}
接下来创建Retrofit对象,调用Service中的方法开始请求
fun getUserInfo(){
        scope.launch {
            val retrofit = Retrofit.Builder()
                .baseUrl("http://www.jianan.com/")
                .addConverterFactory()
                .addCallAdapterFactory()
                .build()
            val resp = withContext(Dispatchers.IO){
                retrofit.create(UserService::class.java)
                    .getUserInfo("123")
            }
          //这里已经拿到了resp,可以进行ui刷新了
        }
    }
上面是一个最简单的请求过程,没对异常什么的进行处理,通过代码可以看出Retrofit第一步通过Builder模式创建了Retrofit的对象,创建过程中哪些参数有什么意义呢?接下来调用create方法创建了Service的对象,我们知道UserService是一个接口,并没有实现类,Retrofit是如何创建Service的对象呢?带着这两个问题探寻一番Retrofit的源码。
Retrofit实例是如何创建的
Retrofit是如何创建Service对象的
先来看看create方法源码
public <T> T create(final Class<T> service) {
    validateServiceInterface(service);
    return (T)
        Proxy.newProxyInstance(
            service.getClassLoader(),
            new Class<?>[] {service},
            new InvocationHandler() {
              private final Platform platform = Platform.get();
              private final Object[] emptyArgs = new Object[0];

              @Override
              public @Nullable Object invoke(Object proxy, Method method, @Nullable Object[] args)
                  throws Throwable {
                // If the method is a method from Object then defer to normal invocation.
                if (method.getDeclaringClass() == Object.class) {
                  return method.invoke(this, args);
                }
                args = args != null ? args : emptyArgs;
                return platform.isDefaultMethod(method)
                    ? platform.invokeDefaultMethod(method, service, proxy, args)
                    : loadServiceMethod(method).invoke(args);
              }
            });
  }
这里使用了Java中的动态代理模式创建了UserService的对象,在Android中默认会调用到loadServiceMethod(method).invoke(args)这行,接下来看下loadServiceMethod做了啥,
/*
* 从缓存中拿方法,拿不到就通过静态方法parseAnnotations进行解析
*/
ServiceMethod<?> loadServiceMethod(Method method) {
    ServiceMethod<?> result = serviceMethodCache.get(method);
    if (result != null) return result;

    synchronized (serviceMethodCache) {
      result = serviceMethodCache.get(method);
      if (result == null) {
        result = ServiceMethod.parseAnnotations(this, method);
        serviceMethodCache.put(method, result);
      }
    }
    return result;
  }
ServiceMethod是对我们Service接口里定义的方法(例子中是getUser方法)的一个封装,parseAnnotations方法如下:
static <T> ServiceMethod<T> parseAnnotations(Retrofit retrofit, Method method) {
    RequestFactory requestFactory = RequestFactory.parseAnnotations(retrofit, method);
		//获取请求方法的返回类型,包含内部泛型,例子里这里就是Response<BaseResponse<User>>
    Type returnType = method.getGenericReturnType();
    if (Utils.hasUnresolvableType(returnType)) {
      throw methodError(
          method,
          "Method return type must not include a type variable or wildcard: %s",
          returnType);
    }
    if (returnType == void.class) {
      throw methodError(method, "Service methods cannot return void.");
    }
		//如果返回值合法就转化为HttpServiceMethod对象
    return HttpServiceMethod.parseAnnotations(retrofit, method, requestFactory);
  }
RequestFactory用来对请求方法的参数、注解啥的进行一次封装,后续可以通过RequestFactory的实例拿到对应的数据,RequestFactory是HttpServiceMethod中的一个属性,接下来看看HttpServiceMethod是如何创建的?解答这个问题前要先理解一下kotlin中的suspend关键字的原理。
static <ResponseT, ReturnT> HttpServiceMethod<ResponseT, ReturnT> parseAnnotations(
      Retrofit retrofit, Method method, RequestFactory requestFactory) {
    boolean isKotlinSuspendFunction = requestFactory.isKotlinSuspendFunction;//是否是kotlin suspend函数
    boolean continuationWantsResponse = false;
    boolean continuationBodyNullable = false;

    Annotation[] annotations = method.getAnnotations();//拿到方法的所有注解
    Type adapterType;
    if (isKotlinSuspendFunction) {
      //如果是suspend函数则需要特殊处理,因为suspend函数编译后会加上一个Continuaton参数,返回值会变为Any
      Type[] parameterTypes = method.getGenericParameterTypes();
      //在这个例子里responseType拿到的是Response<BaseResponse<User>>
      Type responseType =
          Utils.getParameterLowerBound(
              0, (ParameterizedType) parameterTypes[parameterTypes.length - 1]);
      if (getRawType(responseType) == Response.class && responseType instanceof ParameterizedType) {
        // Unwrap the actual body type from Response<T>.
        // 在这个例子里responseType拿到的是BaseResponse<User>
        responseType = Utils.getParameterUpperBound(0, (ParameterizedType) responseType);
        continuationWantsResponse = true;
      } else {
        // TODO figure out if type is nullable or not
        // Metadata metadata = method.getDeclaringClass().getAnnotation(Metadata.class)
        // Find the entry for method
        // Determine if return type is nullable or not
      }
			// 包装为Call<BaseResponse<User>>的形式,之所以这么包装是因为Retrofit定义Service方法时必须使用Call类型作为返回值,如果不包装的话就要自己定义CallAdapter
      adapterType = new Utils.ParameterizedTypeImpl(null, Call.class, responseType);
      annotations = SkipCallbackExecutorImpl.ensurePresent(annotations);
    } else {
      adapterType = method.getGenericReturnType();
    }
		// 从一开始创建Retrofit时注册的CallAdapter中取一个来处理这个请求
    CallAdapter<ResponseT, ReturnT> callAdapter =
        createCallAdapter(retrofit, method, adapterType, annotations);
    Type responseType = callAdapter.responseType();
    if (responseType == okhttp3.Response.class) {
      throw methodError(
          method,
          "'"
              + getRawType(responseType).getName()
              + "' is not a valid response body type. Did you mean ResponseBody?");
    }
    if (responseType == Response.class) {
      throw methodError(method, "Response must include generic type (e.g., Response<String>)");
    }
    // TODO support Unit for Kotlin?
    if (requestFactory.httpMethod.equals("HEAD") && !Void.class.equals(responseType)) {
      throw methodError(method, "HEAD method must use Void as response type.");
    }

    Converter<ResponseBody, ResponseT> responseConverter =
        createResponseConverter(retrofit, method, responseType);

    okhttp3.Call.Factory callFactory = retrofit.callFactory;
    if (!isKotlinSuspendFunction) {
      return new CallAdapted<>(requestFactory, callFactory, responseConverter, callAdapter);
    } else if (continuationWantsResponse) {
      //noinspection unchecked Kotlin compiler guarantees ReturnT to be Object.
      return (HttpServiceMethod<ResponseT, ReturnT>)
          new SuspendForResponse<>(
              requestFactory,
              callFactory,
              responseConverter,
              (CallAdapter<ResponseT, Call<ResponseT>>) callAdapter);
    } else {
      //noinspection unchecked Kotlin compiler guarantees ReturnT to be Object.
      return (HttpServiceMethod<ResponseT, ReturnT>)
          new SuspendForBody<>(
              requestFactory,
              callFactory,
              responseConverter,
              (CallAdapter<ResponseT, Call<ResponseT>>) callAdapter,
              continuationBodyNullable);
    }
  }
OkHttp的使用与源码解析
本文主要介绍OkHttp在android下的使用和对关键源码的解析。
使用方法
源码解析
ReactNative常见BUG以及解决方案
这篇文章主要记录ReactNative开发过程中碰到的一些BUG以及对应的解决方案。
ScrollView与TextInput控件共存导致切换输入框时需要点两下输入框才会显示软键盘
现象描述:当ScrollView中有多个TextInput时,用户想切换输入框时需要点击两次第二个输入框才能弹出软键盘并且第一次点击时软键盘会消失
解决办法:给ScrollView加上keyboardShouldPersistTaps属性并且设置属性的值为handled
<ScrollView keyboardShouldPersistTaps={'handled'}>...</ScrollView>
原因:待考究源码
参考网址:
react-native开发总结之TextInput失去焦点触发事件和TextInput间切换
### React Native 错误 Module does not exist in the module map
现象描述:自己写了个View想在RN使用,确认原生代码无任何问题的情况下RN控制台报错
解决办法:参考下面网址
原因:待考究RN加载module的机制
参考网址:
博客、网站链接收录
这篇文章主要用来收藏一些常用的网站、博客和网页地址。
博客地址
这一章主要是收录一些博客地址、主要是解决平时开发问题时访问的博客
Windows
Java
Java动态代理InvocationHandler和Proxy学习笔记
IDE
IntelliJ IDEA如何设置头注释,自定义author和date
Android
使用Chrome开发者工具调试Android端内网页(微信,QQ,UC,App内嵌页等)
NetworkSecurityConfig:No Network Security Config specified, using platform default
Jekyll
厉害的博客
常用网站地址
模板
这是一个模板文件
文章分类
最近文章
- Java代理模式与动态代理原理 本文介绍代理模式的应用和Java中动态代理的原理
- Kotlin中suspend和async源码解读 本文主要记录Kotlin中suspend关键字和async函数的使用及源码解读
- Kotlin中线程池处理过程 本文主要记录Kotlin中线程池的调度过程
- Kotlin中异常的处理和传播 本文主要记录Kotlin中suspend关键字和async函数的使用及源码解读
- 整数转字符串 本文记录2022年四月份字节跳动三面的算法题目。