本文主要记录LRU算法和其实现方式LinkedHashMap的源码解析。
LRU算法
LRU全称为最近最少使用算法,一般用在缓存中,所以他一般会有个固定的容量,当数据不满时可以一直往里插入数据,当数据满了后再插入数据时会把最先插入的那条数据给移除掉,再把要插入的数据放在最新的位置。举个例子:
假设现在LRU缓存容量为4,我们有[1,2,3,4,5,2,5,6] 这几个数据要保存在LRU缓存中,插入过程如下图所示:
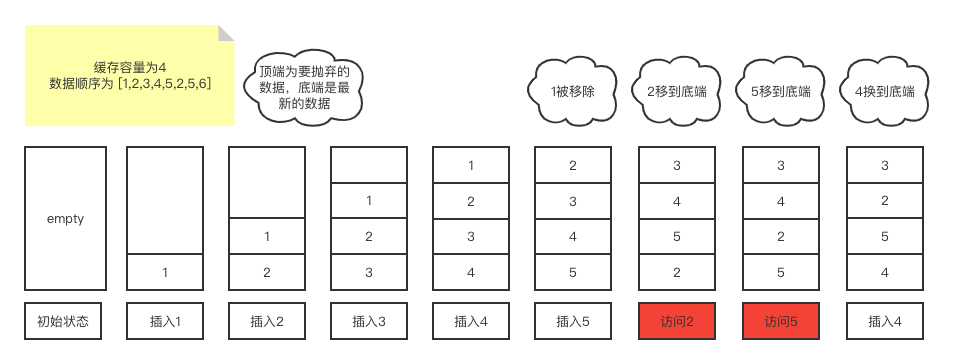
当缓存满了时,LRU在插入新数据时会把最老的那条数据给移除掉,并且把当前数据插入到最新的位置,当访问老数据时会把老数据放到最新的位置,从而保证老数据不那么轻易被移除掉。
知道LRU的特性后,那么问题来了,如何实现这样一个数据结构呢?Java其实给我们提供了一个叫做LinkedHashMap的数据结构,它完美满足了LRU的这些特性。
LinkedHashMap
用法
val map = LinkedHashMap<String,Int>()
map.put("黄二狗",28)
map.put("李大爷",56)
val ageOfErGou = map.get("黄二狗")
val ageOfLiDaYe = map.get("李大爷")
可以看出LinkedHashMap和HashMap的用法看上去是差不多的,接下来可以探究下LinkedHashMap的源码。
源码解析
类和构造函数
public class LinkedHashMap<K,V> extends HashMap<K,V> implements Map<K,V>{

   /**
     * The head (eldest) of the doubly linked list.
     */
    transient LinkedHashMap.Entry<K,V> head;

    /**
     * The tail (youngest) of the doubly linked list.
     */
    transient LinkedHashMap.Entry<K,V> tail;

		public LinkedHashMap() {
        super();
        accessOrder = false;
    }

  	static class Entry<K,V> extends HashMap.Node<K,V> {
        Entry<K,V> before, after;
        Entry(int hash, K key, V value, Node<K,V> next) {
            super(hash, key, value, next);
        }
    }

  	//此处重写了HashMap中的newNode方法,newNode方法会在put方法里被调用
  	Node<K,V> newNode(int hash, K key, V value, Node<K,V> e) {
        LinkedHashMap.Entry<K,V> p =
            new LinkedHashMap.Entry<K,V>(hash, key, value, e);
        linkNodeLast(p);
        return p;
    }

  	 // link at the end of list
    private void linkNodeLast(LinkedHashMap.Entry<K,V> p) {
        LinkedHashMap.Entry<K,V> last = tail;
        tail = p;
        if (last == null)
            head = p;
        else {
            p.before = last;
            last.after = p;
        }
    }
}
可以看出LinkedHashMap继承自HashMap,所以它具有HashMap的基本特性,他的Entry类也是继承自HashMap的Node类,并且添加了before、after两个节点,所以它的Entry其实是个双向链表。LinkedHashMap内部结构大致如下所示:
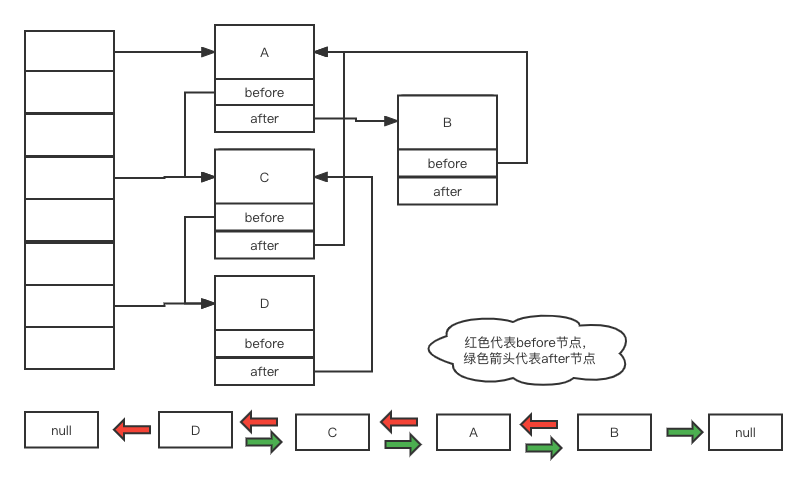
根据HashMap的特性我们可以知道,在没有hash冲突的情况下HashMap查找效率为O(1),所以LinkedHashMap在插入数据时可以迅速找到要在数组中插入的位置,随后通过往双向链表的末尾添加一个Entry实现新数据永远在双向链表的末尾,老数据永远在双向链表的头部,当新老数据交换时只需要操作头尾指针即可(有可能要先通过HashMap查找),由于链表的插入和删除都是O(1)复杂度,所以保证了LinkedHashMap的操作基本都是O(1)的时间复杂度。
LinkedHashMap完美解决了LRU缓存的实现问题,但是如果叫我们自己去实现一个时间复杂度为O(1)的LRUCache那么该怎么去实现呢?
自己实现一个LRUCache
这是LeetCode上的一道算法设计题LeetCode题目146LRUCache,具体实现代码如下:
class LRUCache(capacity: Int) {

    private val mCap = capacity//容量
    private val map: HashMap<Int, Entry> = HashMap(capacity)//方便O(1)查找
  	//辅助节点很重要,不然要写一大堆if逻辑,容易出错
    private var head: Entry = Entry(-1, -1)//辅助头节点,不会变化,head永远指向此对象
    private var tail: Entry = Entry(-1, -1)//辅助尾节点,tail永远指向此对象,辅助节点

    init {
        head.next = tail
        tail.prev = head
    }

    //删除真正意义上的头节点
    fun deleteRealHead(entry: Entry) {
        head.next = entry.next
        entry.next?.prev = head
        entry.prev = null
        entry.next = null
    }

  	//删除当前节点
    fun deleteEntry(entry: Entry){
        entry.prev?.next = entry.next
        entry.next?.prev = entry.prev
        entry.next = null
        entry.prev = null
    }

  	//把当前节点添加到末尾
    fun add2tail(entry: Entry){
        entry.next = tail
        entry.prev = tail.prev
        tail.prev?.next = entry
        tail.prev = entry
    }

    fun get(key: Int): Int {
        val entry = map.get(key)
        if (entry == null) {
            return -1
        }
        deleteEntry(entry)
        add2tail(entry)
        return entry.value
    }

    fun put(key: Int, value: Int) {
        val entry = map.get(key)
        val size = getSize()
        if (entry == null) {
            val newEntry = Entry(key,value)
            map.put(key,newEntry)
            add2tail(newEntry)
            if(size >= mCap){
                //满了
                map.remove(head.next?.key!!)
                deleteRealHead(head.next!!)
            }
        }else{
            entry.value = value
            deleteEntry(entry)
            add2tail(entry)
        }
    }

    fun getSize(): Int {
        return map.size
    }

  	// 封装的数据结构(双向链表),包含key、value和左右两个兄弟节点
    inner class Entry(val key: Int, var value: Int, var prev: Entry? = null, var next: Entry? = null)
}
核心步骤如下:
- 定义Entry类(双向链表),包含key、value和左右兄弟节点
- 定义两个辅助节点head和tail(key和value随便取),在整个数据操作过程中head和tail指向不会改变。
- 定义一个Map存储key和Entry对
- 当get时需要把get的数据移动到末尾(前提已经存在这条数据)
- 当put时需要根据情况进行操作,具体看代码